1.4. Moving Head
This component offers low-level control over the pan-tilt projector. Please read this entire introduction before using the projector!
Warning
Seriously, read this introduction! This is not a case of figuring stuff out while you go!
The component doesn’t manage the lamp state directly; it just passes your commands through to the DMX interface. There is no backchannel at all, so all the component can do in the end is guess what state the projector is in. When the lamp is switched off, it will take 8 seconds for the lamp to actually switch off (during which the lamp state will already self-report as “off” via this interface). The lamp will then have to cool down before you can switch it on again. This component will have no knowledge about the temperature and whether it is possible to switch on the lamp. If the lamp is set to “on” but doesn’t actually turn on, the component will report a running lamp without any physical manifestation of this fact whatsoever. The same is true for all movements that are being carried out but haven’t finished yet. The component will always report the target angle, not the current angle. Basically, this component will lie to you every chance it gets. This isn’t due to malice but the lack of a backchannel though.
You can use the shutter to disable the projector image without switching off the lamp. However, the lamp’s lifetime is limited to 1000 hours (a bit more than 40 days) so don’t leave the lamp running unnecessarily.
Warning
After switching off the lamp, the projector needs to cool down for at least five minutes before switching off its mains supply. The stop script should do this automatically which means that stopping this script might take an extremely long time! If anything went wrong and the projector is in an undefined state, starting will take equally long because the script will go through the whole on-off cycle just to be sure.
Angles in the RSB interface use floating point values which is converted internally into two bytes of precision for the DMX communication. This conversion is not standardized which means that the actual angle might differ slightly from the exact floating point value given. We simply map the range \([\text{minimum angle}, \text{maximum angle}]\) to \([0, 65535]\) in a linear fashion without regard for what the hi and lo byte actually mean in terms of physical angle. However, this means that by sticking to the range from minimum to maximum, you will always be able to use the full range of the moving head.
The component currently supports two display modes: color and picture. In color mode, the whole projection area will be filled by a uniform color that can be freely chosen using a 24-bit RGB value.
In picture mode, a 720×480 color JPEG is read from the SD card in the projector. See below for details on how to determine the ID of a picture to send and some currently installed pictures. The mode is changed automatically when you call setColorRGB()/setColorHSV() or setPicture() respectively. While the projector can display a VGA signal, this is not currently supported using this API.
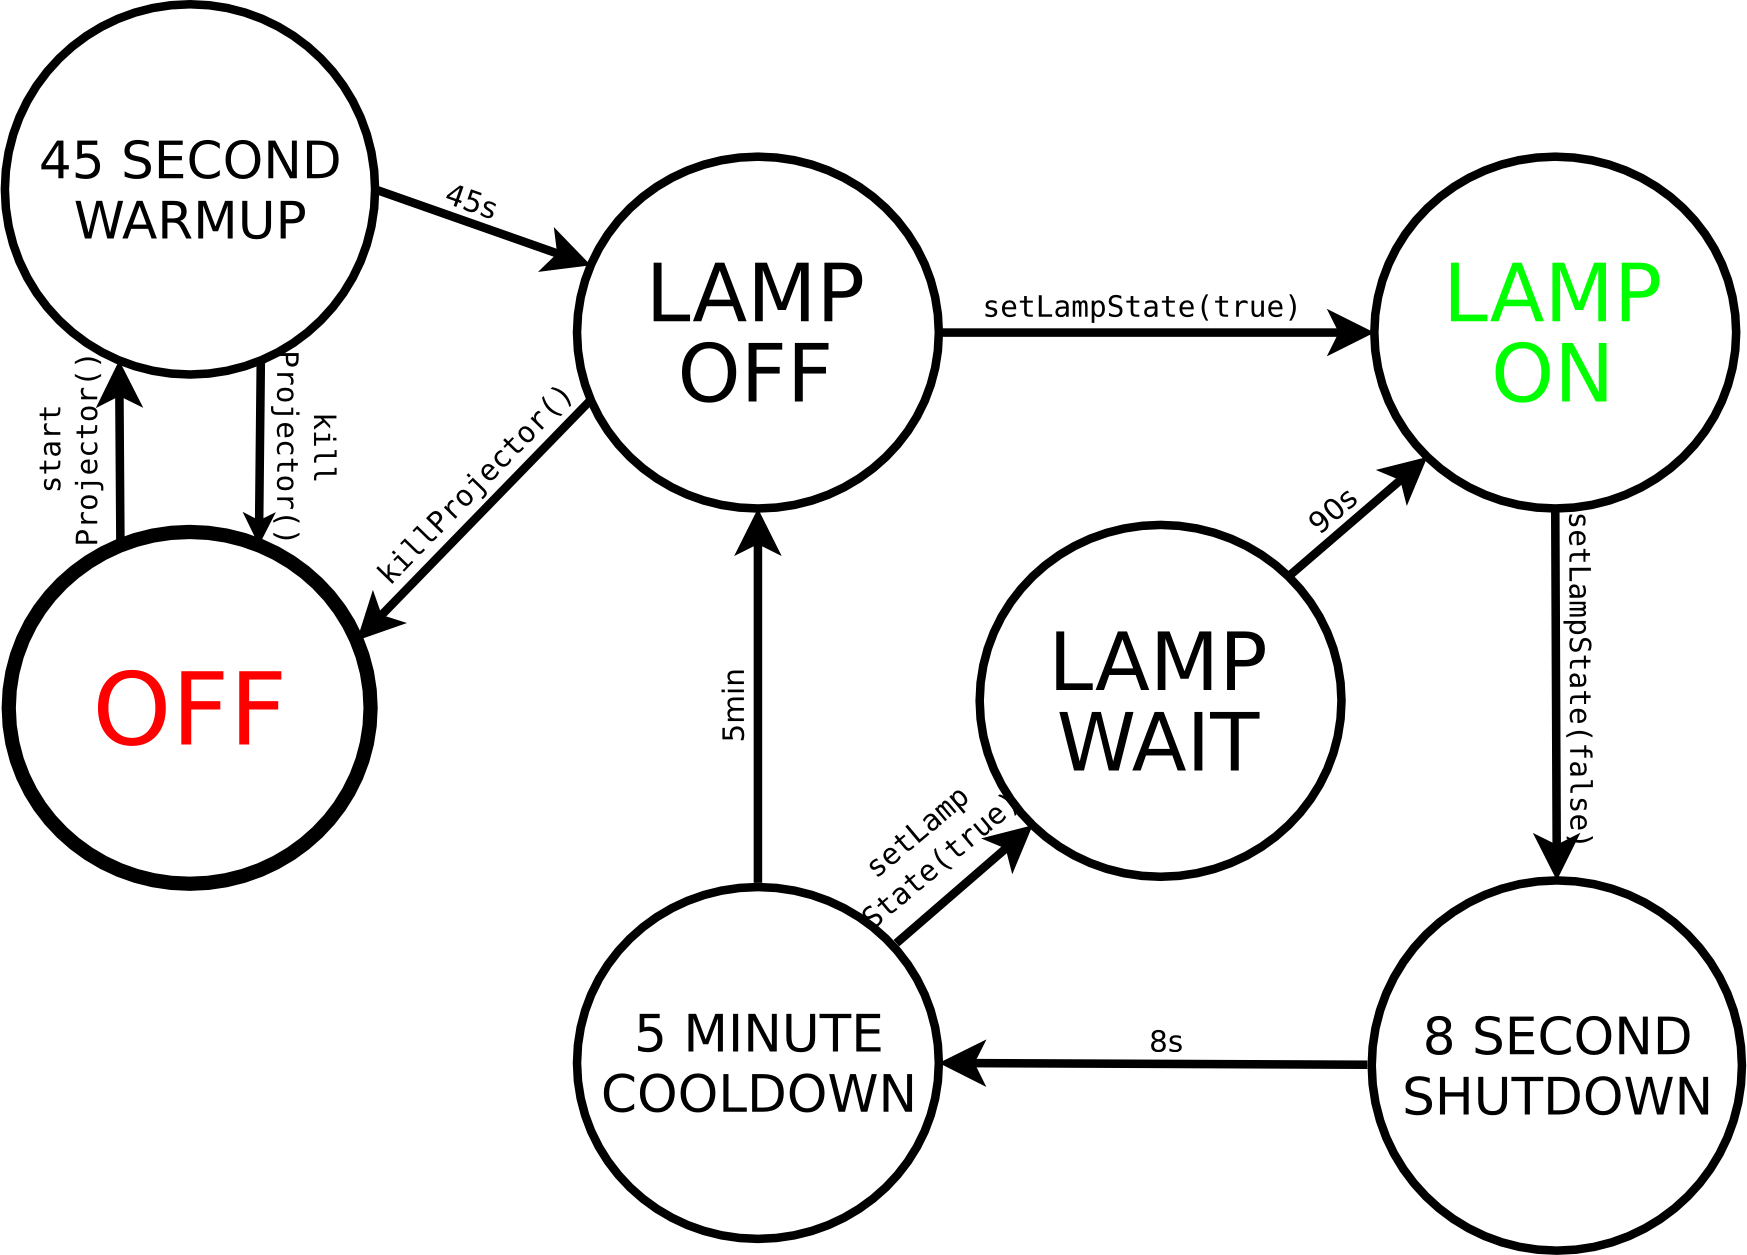
After starting the vdemo component, the projector should be in a state called “OFF” where the power plug is set to off so it will be cut from mains electricity. By sending the RPC command startProjector(), the power plug will be switched on and the projector will go into a self-test mode that will take about 37 seconds (it will become ready after exactly 45 seconds). This state is called “WARMUP”. After it is finished, it will automatically switch into the state “LAMP OFF”. You can now send the RPC setLampState(true) that will put the projector into the state “LAMP ON” at which point it is fully ready to function. Most calls are not available before this point and will be ignored.
Sending setLampState(false) will cause the projector to go into a shutdown mode. There will first be a visual countdown of 8 seconds on the projected image during which the state is “8S SHUTDOWN”. After that, the lamp will be off but the state is “5MIN COOLDOWN” which unsurprisingly takes 5 minutes before going into “LAMP OFF” again. Only then can you send killProjector() to cut mains electricity again.
You can interrupt the cooldown by setting the lamp to on again. This will not be an immediate process, however, and a state “LAMP WAIT” will be active for 90 seconds before “LAMP ON” is reached again. Notice that there is not necessarily a guarantee that the lamp will actually be available after 90 seconds. This will depend on the ambient temperature and there is no way of querying if the lamp is actually on again and the projector has completed a short procedure that goes along with screen changes and an unresponsiveness to external commands.
1.4.2. Interfaces
1.4.3. Picture Interface
The projector can display a maximum of 1024 pictures stored on the SD card. These are stored in 32 blocks at 32 image files each. Each block has its own directory. The naming scheme is as follows:
image 17 in block 3 is called /DVS-2500/Image/Image003/I003_017.jpg. Notice the block number is repeated in the image file name. Block and image numbers start at 0.
For convenience, this block structure is hidden in handling the images in this component. Therefore, block 0–31 and image 0–31 are mapped to one range 0–1023. There is a further complication, though, in that the first block is inaccessible for layers 1 and 2 and only usable in layer 3. Since layer 1 is currently used, block 0 is removed from the numbering (or more precisely, moved to the end).
Therefore, the aforementioned image 17 in block 3 would get the ID \(((\text{block}-1) \mod 32) \cdot 32 + \text{image} = (3-1) \cdot 32 + 17 = 81\).
Some potentially useful images for pointing purposes have the following IDs:
| ID | Description | Image |
|---|---|---|
| 1 | large circle |  |
| 7 | medium-sized circle |  |
| 8 | small circle |  |
| 96 | large, fuzzy circle |  |
| 97 | small circle, slightly fuzzy |  |
| 60 | color test |  |
Todo
An automatically generated gallery of all pictures would be nice.
All images after number 97 are currently empty, so custom images can be added very easily as long as image format and naming scheme are followed. They are then instantly accessible.
1.4.4. Angle Orientations
For an elevation/tilt of 45 degrees, the following azimuth/pan angles point into these directions:
| Angle | Points to |
|---|---|
| 0 | 4K screen |
| 90 | Kitchen/hallway |
| 180 | Couch wall |
| 270 | Window |
Obviously, an angle of more than 90 degrees will invert these directions.
1.4.5. Code Examples
The following code assumes the projector is in the LAMP OFF state which is the case after the vdemo component has executed fully.
1 2 3 4 5 6 7 8 9 10 11 12 13 14 15 16 17 18 19 20 21 22 23 24 25 26 27 28 29 30 31 32 33 34 35 36 37 38 | import rsb
import time
import rst
import rstsandbox
import rstexperimental
import logging
from rst.geometry.Translation_pb2 import Translation
logging.basicConfig()
registerGlobalConverter(ProtocolBufferConverter(messageClass = Translation))
rsb.__defaultParticipantConfig = rsb.ParticipantConfig.fromDefaultSources()
with rsb.createRemoteServer('/home/living/movinghead/') as server:
# switch on lamp
server.setLampState(True)
# create 3D point with x/y/z values in meters from living room coordinate system
t = Translation()
t.x = 2.5 # window axis
t.y = 4.0 # wall axis
t.z = 3.0 # ceiling axis
# move projector
server.lookAt(t)
# open shutter for 3 seconds and switch off lamp
server.setShutterState(True)
time.sleep(3)
server.setLampAndShutterState(False)
# wait for projector to be in off state
while server.getFSMState() != "LAMP OFF":
time.sleep(1)
# switch projector off completely
server.killProjector()
# switch projector on again
server.startProjector()
while server.getFSMState() != "LAMP OFF":
time.sleep(1)
|
Todo
Specify which methods can be called in which states and what the error return value is.

